How to Build a Beehive
If you are thinking about becoming a beekeeper, the first step is to find a community of people on the same learning journey. The next is to build a hive — the home for your bees.
Charlie Canny, Noble Research Institute director of facilities, manages two beehives and is active in the Texoma Beekeepers Association (TOBA). Pat Tickel, TOBA president, has been managing bees for 12 years. Canny and Tickel say one of the best parts of beekeeping is the close-knit community of people who come together and help each other achieve their goals, whether to sell honey, pollinate crops and flowers, or simply enjoy these fascinating insects.
Supplies
- Cut pine wood or bee box kits (see note)
- You will need the following components for a 10-frame Langstroth hive:
- 2 brood boxes and 3 super boxes (this is a starting point; some beekeepers use more, depending on their bees’ productivity)
- 10 frames per box
- 1 bottom board
- 1 inner cover
- 1 outer cover
- Wood glue and brush
- 6-penny nails
- Screws
- Hammer
- Clamps and square
- Paint (white or other light/pastel color)
- Nail gun (optional)
- Cordless drill/driver with driver and drill bits (optional)
- Frame assembly jig (optional)
Note: While you can cut your own pine wood to size for the boxes and frames, Charlie Canny says it’s usually also cost effective to buy kits. The kits come with precut wood pieces in the right dimensions, and they are often built to include finger joints that give extra strength to the box. If you would like to build your hive from scratch, see the appropriate dimensions for a 10-frame Langstroth beehive at bit.ly/frame-langstroth-beehive. Langstroth beehives can also be built slightly smaller, with eight frames.

Directions
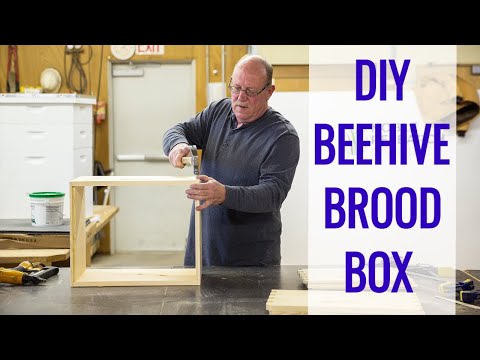
Build the brood and super boxes
Step 1: Brush wood glue onto the wood and join the edges of the boxes, making sure that the handles are on the outside if you are using a kit that offers built-in handles. This is an important step because wood swells as it ages, creating gaps. The glue helps solidify corners, ensuring the beehive can last several years. It’s common for a hive to remain in good condition more than 10 years.
Step 2: Use a hammer to ensure that all edges are well joined. Then attach clamps to the glued box and use a square to make sure the corners are perfectly squared.

Step 3: Nail the box together with a basic hammer or with a nail gun. You’ll want to make sure there is a nail at each finger joint, or about 36 in one brood box.
Step 4: Once the box is built, paint it with an exterior latex paint to protect the wood against the weather. White is the most popular color because it helps reflect light, which keeps the bee home cool in the summer. Other popular colors include pastels, like yellow, green and pink.

Build the frames
Step 1: If the kit has a piece (called a “wedge”) that snaps out of the top bar, remove it. Then brush wood glue onto the edges of the other pieces and stick them together. They should easily snap back snugly into place.
Step 2: Add a piece of foundation to the frame. The foundation is where the bees will do their work. They are frequently embossed with small honeycomb shapes that encourage the bees to use them. Each cell is the exact size needed for one egg to be laid and hatched. Foundations can be made from natural wax or plastic. They often have a waxy film on them.
Step 3: Reinstall the wedge, then nail all the sides together. Use shorter nails to reinforce the area around the wedge.
Optional: If you have a frame assembly jig, you can make all 10 frames at one time.

Setting up the hive
The Langstroth beehive, which is named after Rev. L. L. Langstroth — the father of American beekeeping and the mind behind this still-popular design, is made up of several boxes. Each is stacked on the other throughout the season as the bees become more productive.
Step 1: Place a “bottom board” on bottom. The bees will fly in and out of the hive through this board. When you have a young or small colony, you can install an “entrance reducer,” that restricts the entry space. This allows the bees to more easily protect themselves against intruders, like crickets and mice. Bottom boards can be purchased or made from a kit or from scratch.
Step 2: Place one of the brood boxes on top of the bottom board. Once you get bees, you will install them in this box. The queen bee will lay her eggs in the brood box, and worker bees will use it to store pollen and honey that the colony will consume.
Step 3: Place an “inner cover” over the brood box. This prevents the bees from completely sealing up the box. Place an “outer cover” on top of this. There are different types of outer covers. The one Charlie Canny uses is called a “telescoping cover.”
Step 4: Once you have installed bees, the setup is called an “apiary.” When the bees have filled the bottom brood box about 80 percent full, place another brood box on top. Once that box is 80 percent full, top it with a super box, which is slightly shorter than a brood box. Continue this process as much as needed. Beekeepers harvest honey from super boxes, which once full can weigh up to 60 pounds.


Comment
Leave a Reply
1 comment on: "How to Build a Beehive""
Misheck
February 28, 2025Very fantastic job